Guide for Students
Guide for Students
____
2. Log in / Log out / Forgot password
1. CREATE AN ACCOUNT
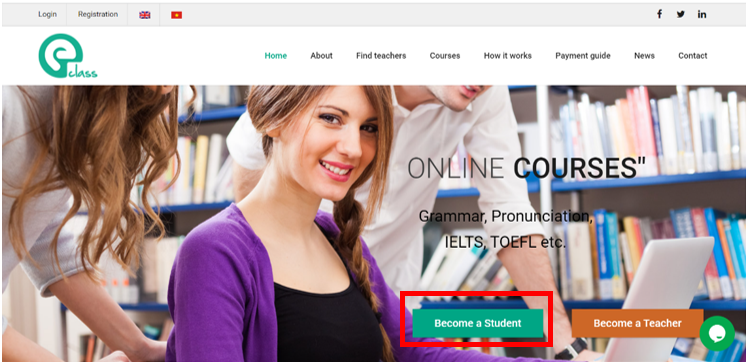
Step 1: Click the Become a Student button on the homepage.
Step 2: Fill in the required information in the registration form. Then please click the Submit button to register.
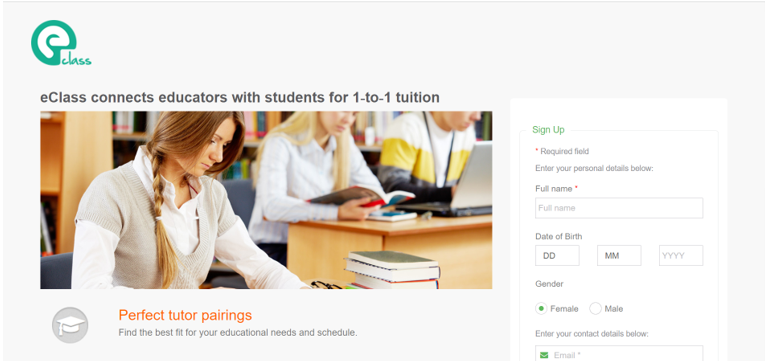
Step 3: After submitting the form successfully, you will receive an email from eClass to verify your account. Click on the verification link in the email to complete your registration. If you cannot find the email in your Inbox, please check your Spam/Junk mailbox.
2. LOG IN / LOG OUT / FORGOT PASSWORD
2.1 Log in
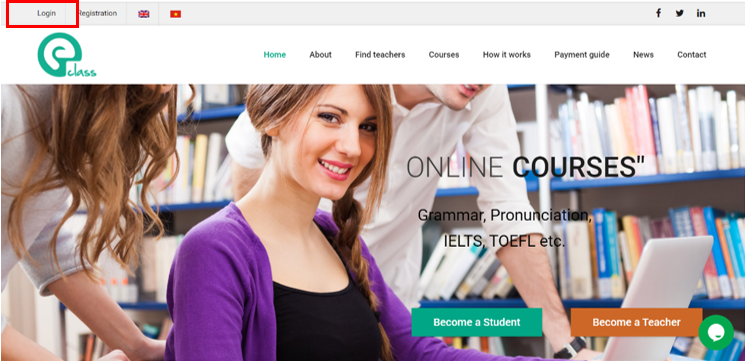
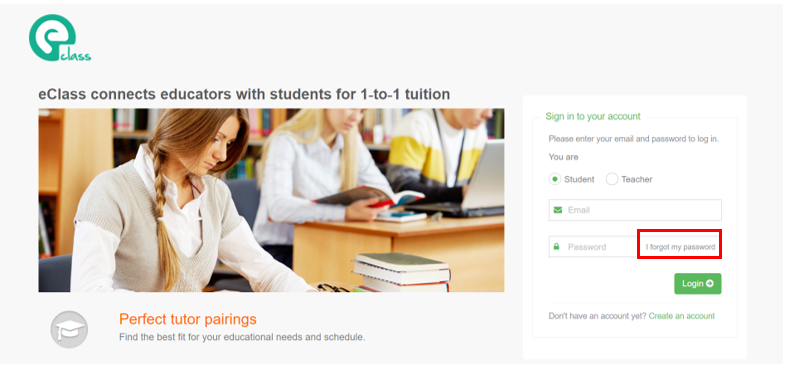
Step 1: Click Login in the top left corner of the homepage.
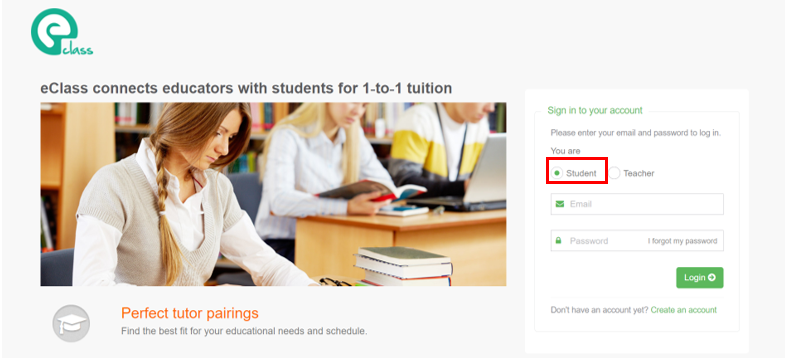
Step 2: In the form, select Student. Then fill in your email and password, and click the Login button.
2.2 Log out
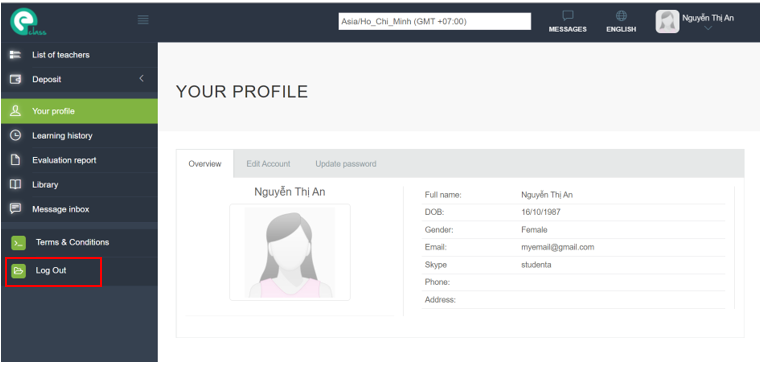
To log out, click Log Out in the left menu.
2.3 Forgot password
Step 1: Click I forgot my password in the login form.
Step 2: Select Student and enter your email address. Then click the Submit button.
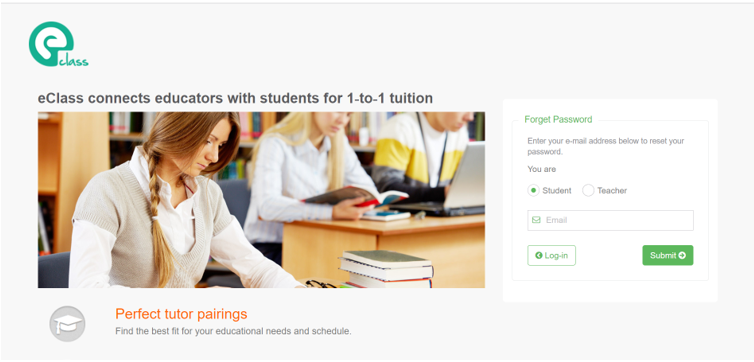
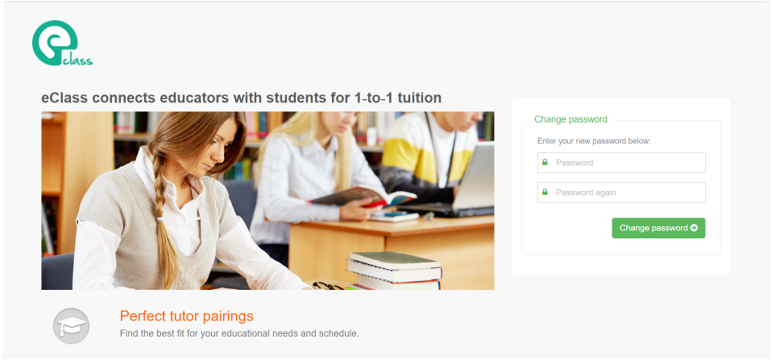
Step 3: You will receive an email from eClass with a link to reset your password. After clicking the link, please enter your new password in the form and click the Change password button.
3. UPDATE PROFILE
3.1 Update profile
Step 1: Select Your profile from the menu on the left. Then select the Edit account tab.
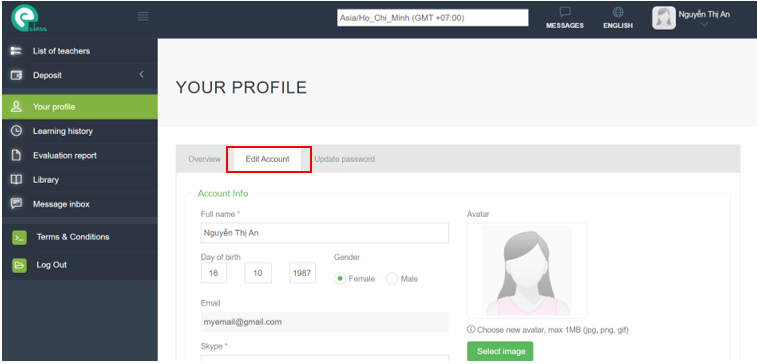
Step 2: Fill in the information you need to update. You can edit everything except Email. Please note:
Skype field: The Skype account you use to teach online. You need to provide this information so that your teacher can see it. If you don't have a Skype account, download the Skype application and create one for free.
The contact information you provide on this page, including Email, Skype, Phone and Address, will not be publicly displayed.
After filling in the information, please click Update.
3.2 Change password
Step 1: Select Your profile from the menu on the left. Then select the Update password tab.
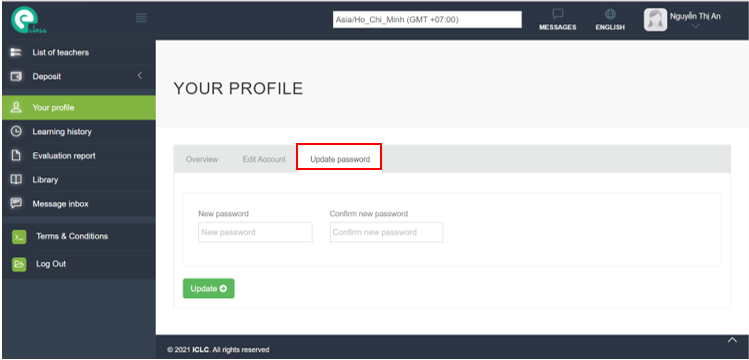
Step 2: Enter your new password and click the Update button.
3.3 Change time zone
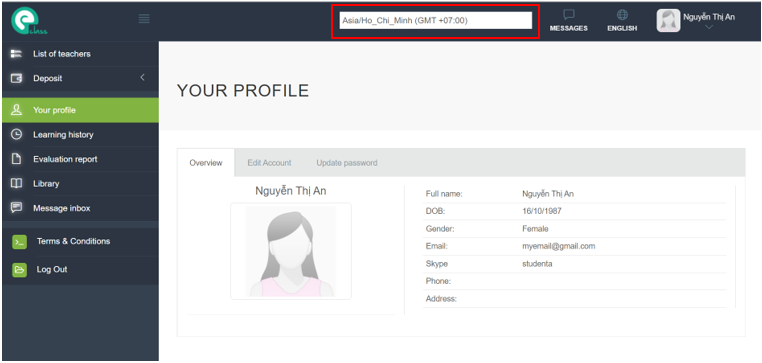
You can update the time zone by selecting the time zone in the list at the top of the page. The time on the website will be displayed in this time zone.
4. DEPOSIT
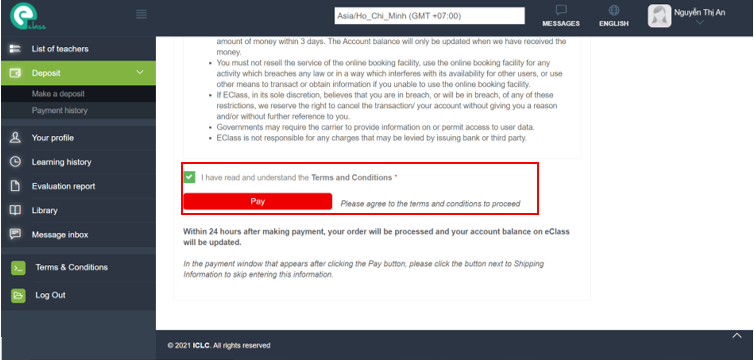
Step 1: Select Deposit -> Make a deposit from the menu on the left.
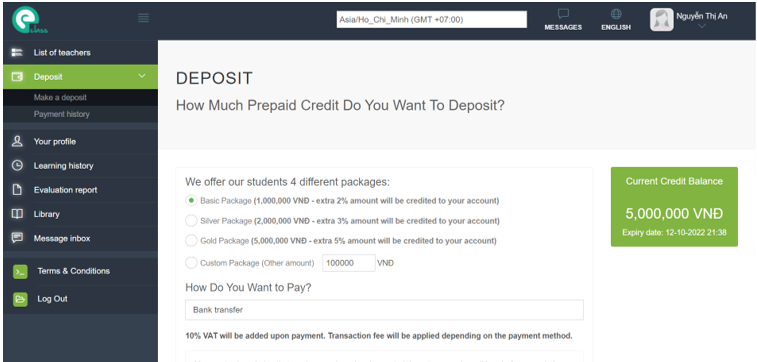
Step 2: Choose your tuition package and payment method. Tick to accept the payment terms and conditions, then click Pay. A transaction fee will be charged depending on the payment method you choose.
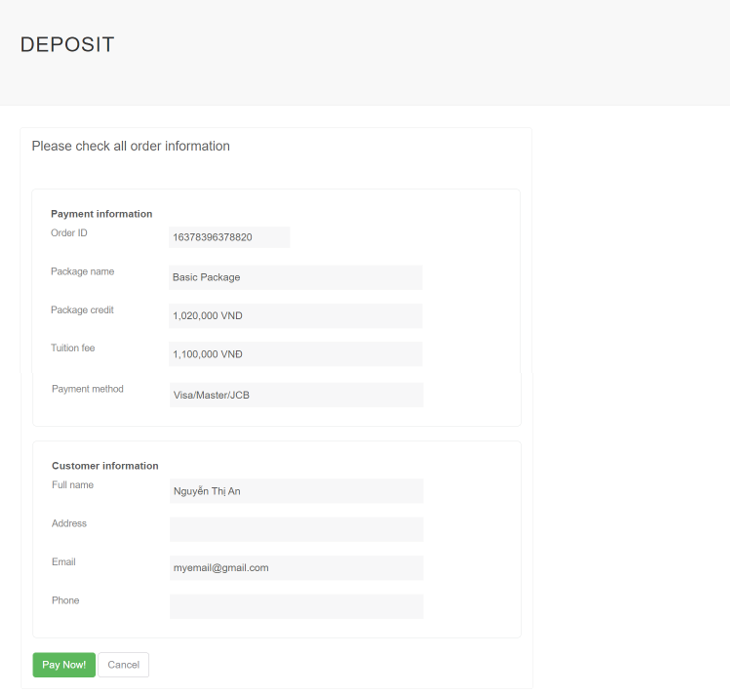
Step 3:
A. Payment via Visa/Master/JCB cards
On the next page, please check your information and click Pay Now.
On the page for our payment partner (VTCPay), please enter all the information correctly and click Confirm.
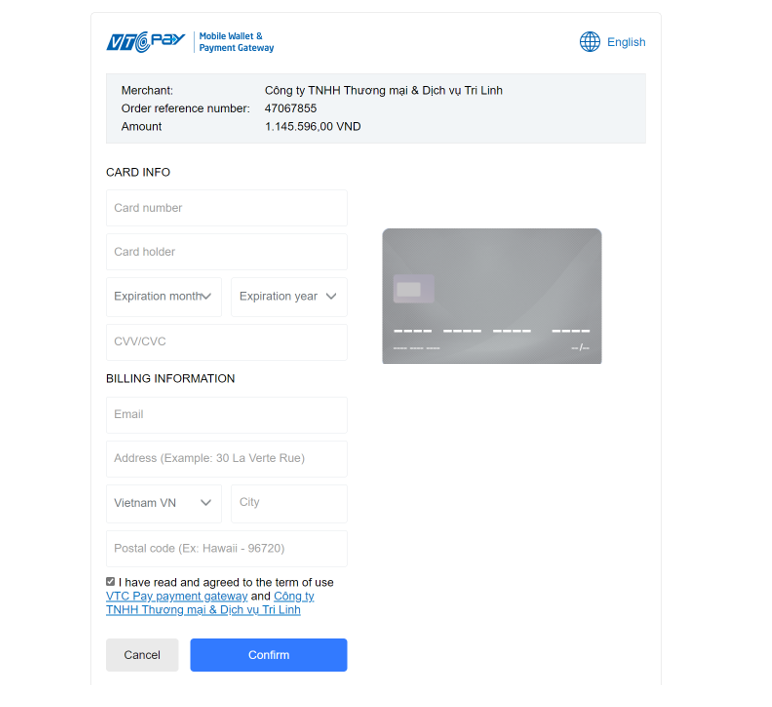
You will then be asked to verify OTP to complete the payment.
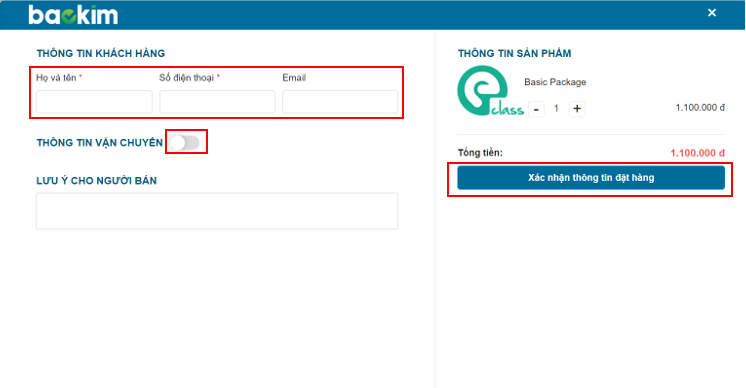
B. Payment via Bank transfer, QR code, Direct payment, and domestic ATM cards
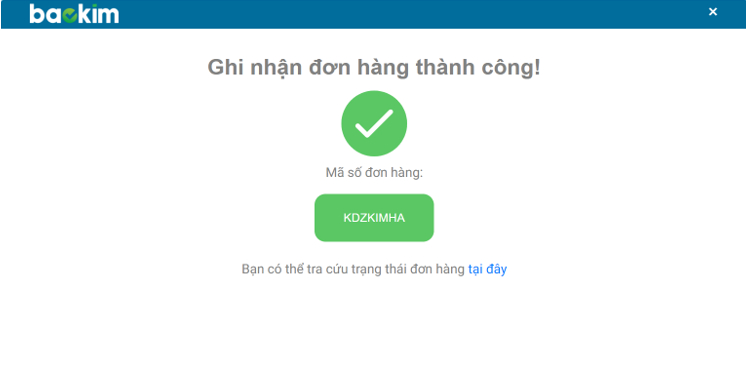
On the page for our payment partner (Bao Kim), please enter your full name (Họ và tên), phone number (Số điện thoại) and email. Please enter this information correctly and make sure that the information you have entered is the same as the information you have entered on eClass so that we can compare and process the order. Click the button to the right of the Thông tin vận chuyển (Shipping information) section to skip this section. Then click Xác nhận thông tin đặt hàng (Confirm order information).
On the next screen, choose a form of payment (COD is not applicable). After choosing, you can see the total fee information to pay above. For example, here the Bank transfer (Chuyển khoản) method is chosen.

Depending on the selected payment method, follow the on-screen instructions to complete the payment. Except for direct payments, as soon as the payment is successful, you will receive a message similar to the following on the screen.
Within 24 hours of receiving payment, we will process your order and update your eClass account balance. You will receive an email notification when the balance is updated. The money in the eClass account can be used to book lessons within 12 months from the date of the last deposit.
5. BOOK A LESSON
Step 1: Select List of Teachers from the menu on the left.

Step 2: You can enter the search criteria for teachers and click the Search button.
Step 3: Click the Book now button to view and book a lesson with the teacher of your choice.
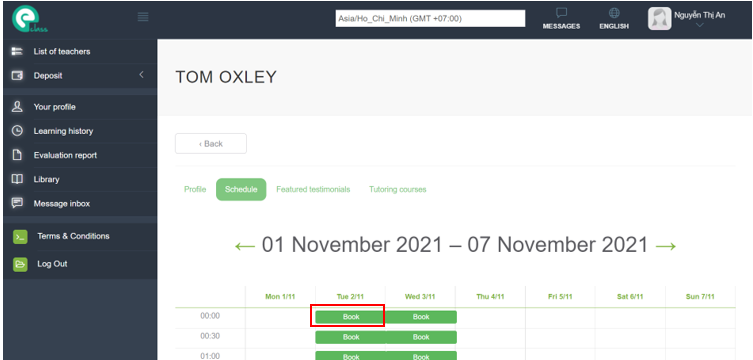
Step 4: Select the appropriate time slot and click Book to proceed with the booking. The booking dialog box will appear.
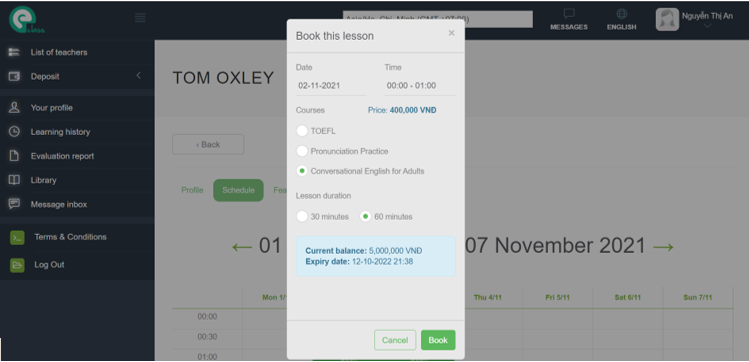
Step 5: Select the course and the duration of the lesson, and click the Book button, then click OK in the confirmation dialog to process the booking. The amount displayed in the Price section is the tuition fee to be paid for the lesson. You can only book a lesson if the balance in your eClass account is greater than or equal to the price. Upon successful booking, the lesson fee will be deducted from your account.
6. VIEW / CANCEL A LESSON
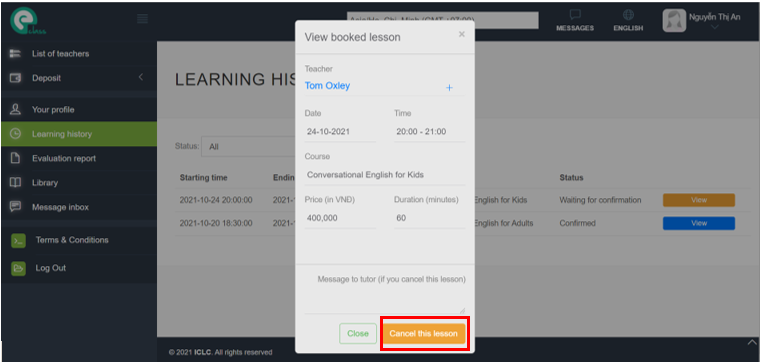
You can only cancel a lesson that has not been confirmed by the teacher, or a lesson that has been confirmed but must be 24 hours before the class time. For a trial lesson, you cannot cancel once it has been confirmed by the teacher. When you cancel a lesson, the course fee will be refunded to your eClass account. In case you do not show up for the uncancelled class, you will not be refunded.
Step 1: Select Learning history from the menu on the left.
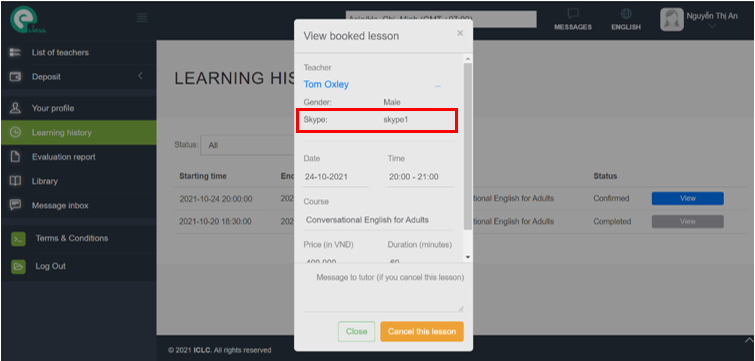
Step 2: Click the View button to the right of the lesson you wish to view / cancel and a dialog box will appear.
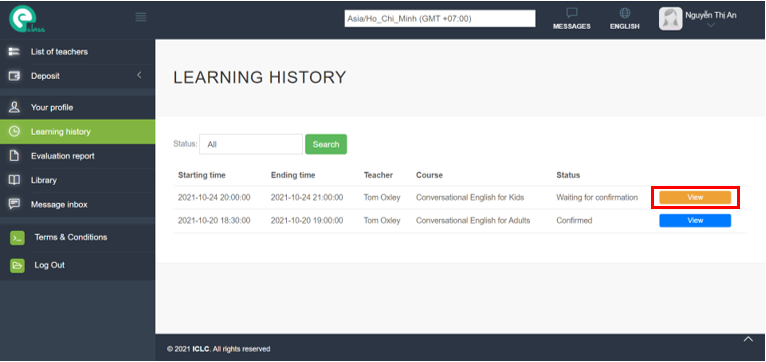
Step 3: You can view the lesson details in the dialog box. You can also see the teacher's Skype account by clicking the + sign to the right of the teacher's name (the teacher will also see your Skype account through the system). The teacher will call you through Skype for the class using this account.
To cancel the lesson, please leave a message to the student about the reason for cancelling in the Message field. Then click the Cancel this lesson button to cancel the lesson.
7. RATE A LESSON
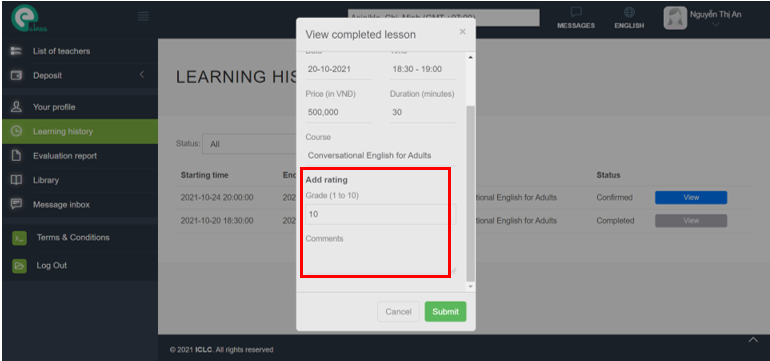
You can rate and comment on the lesson after the lesson is over.
Step 1: Select Learning history from the menu on the left.
Step 2: Click the View button to the right of the lesson to be assessed and a dialog box will appear.

Step 3: Fill in the evaluation information including Grade and Comments in the dialog box, then click the Submit button.
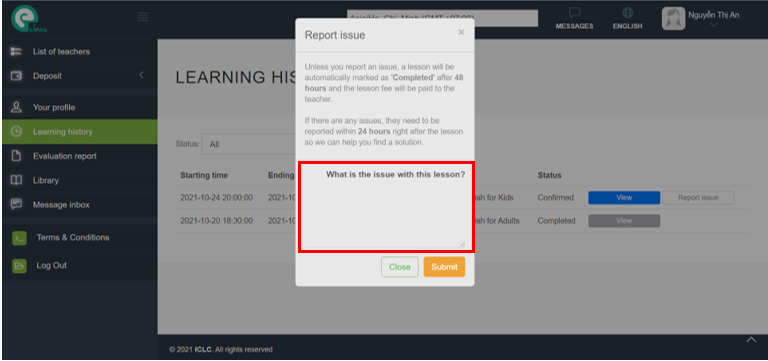
8. REPORT AN ISSUE
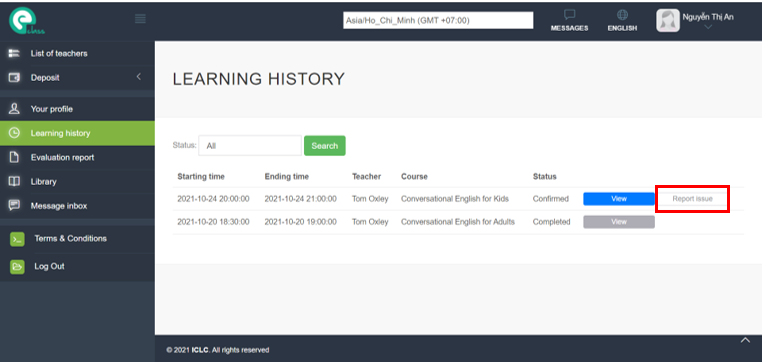
Step 1: Select Learning history from the menu on the left.
Step 2: Click Report issue corresponding to the row containing the lesson to report the problem, the dialog box to report the problem will appear.
Step 3: Enter the content of the issue to report and click the Submit button. We will receive this information and respond within 48 hours.
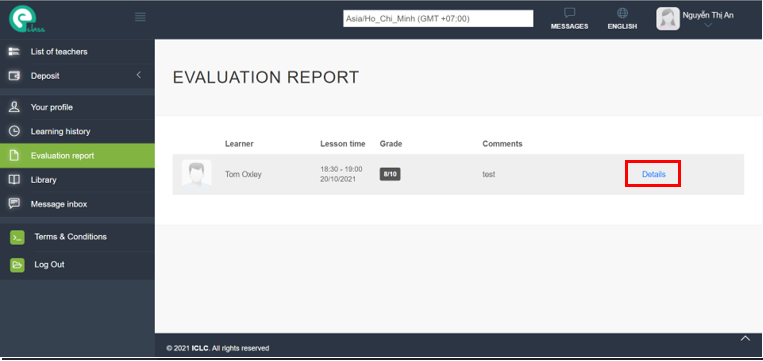
9. VIEW TEACHER EVALUATIONS
After the lessons, the teacher can comment on your learning progress. To view teacher comments, please select Evaluation report from the menu on the left. You can click Details to view the full review.
10. VIEW LESSON MATERIALS
Step 1: Select Library from the menu on the left.

Step 2: Select the course you want to view the materials for. The available lesson materials will then be shown. Click on the lesson you want to view materials for.
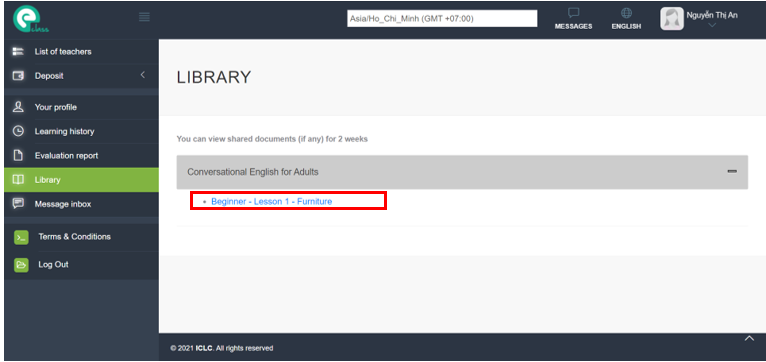
Step 3: You will see the document on this page, click the arrows to switch slides. To return to the library click the Back to Library link.

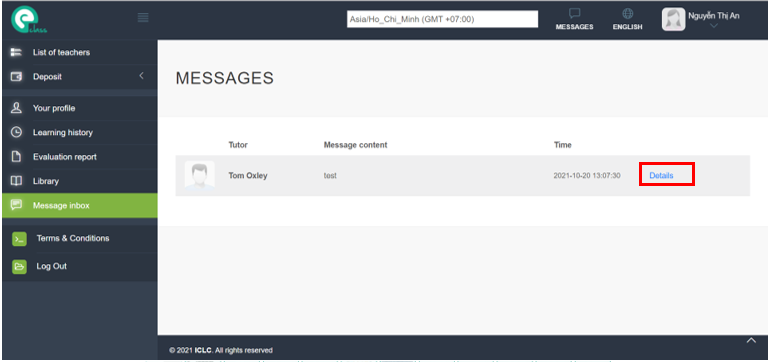
11. SEND MESSAGES
You can only message teachers with whom you have booked classes.
Step 1: Select Message Inbox from the menu on the left.
When there is a new message, you will see the message icon in the right corner with a red dot like this  . You will also receive an email from the system notifying you of a new message.
Step 2: Click Details to view the messages between you and the teacher.
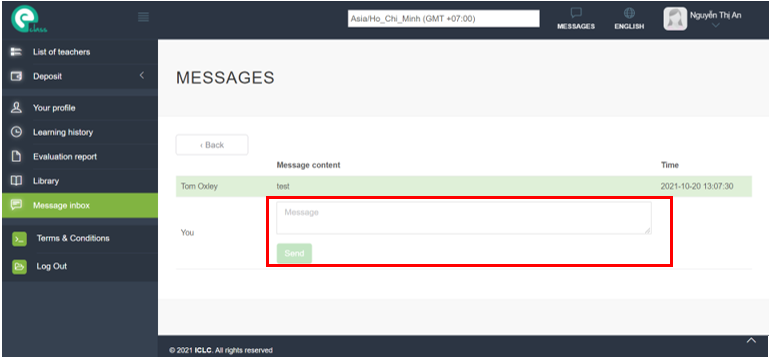
Step 3: On this page you can send a message to the teacher by filling in the message and clicking the Send button.
 If you need support, please contact us.
Search for teachers
I enjoy learning English with native speakers, but I have been living so far away from Ho Chi Minh city. My hometown is in Can Tho province. But through eClass, I can learn this language with foreign teachers as it is fun to skype with them. English is the subject that I study the best comparing to others at school.
I enjoyed studying a foreign language before but I thought that I am not young anymore and I would rarely communicate with foreigners. Therefore, I was hesitant to participate in any English courses. But suddenly when I was taking a business trip abroad, I found it compulsory to spend an hour per day to study with eClass. Its effect made me feel worthy for what I spent and it brought me the respect from my colleagues, a good evaluation of superiors and even the pride from my children that made me extremely happy.
While my friends at the same age who are very good at English and they are able to keep up with studying to achieve international corporations to apply jobs in national corporations with high salary. Because of the limit of English, I earn less than them. To seek for a better job, I determined to join in an English class and after an 8 month course, my English is consolidated and now I am setting a new goal that is to find out a teacher to teach me about technical English.