Guide for Teachers
Guide for Teachers
____
2. Log in / Log out / Forgot password
8. View teaching hours and fees
* GENERAL INFORMATION
How it works
-
To become a teacher on our website, you first need to create an account. Then please update your profile, courses, and your available schedule. Your profile and available schedule will be displayed on the website. Students will see this and book according to your availability. You can choose the types of course you offer and choose the price for your lessons (VND/hour). Any updates to your profile will be reviewed and approved by the website's admin before being published.
-
On the website, students can search through the list of teachers provided and choose the ones they would like to have lessons with. They then book lessons through the website according to the teachers' schedule. Students need to book a lesson at least 24 hours before the lesson. The lesson duration can be 30 minutes or 60 minutes.
-
Teachers will be informed by email about the bookings and need to confirm or cancel the booking through the website. Confirmation must be made at least 8 hours before the starting time or it will be cancelled automatically. Cancellations of confirmed lessons need to be made at least 24 hours prior to the lesson. Should short notice cancelations take place it will result in your account being postponed for a 2-week period in which time you shall not be booked for future classes. Please note that repeating such actions may negatively impact the teachers' reputation among the students and the teachers’ accounts may be cancelled.
-
The confirmed lessons will then be conducted at the scheduled time through Google meet. To make sure we deliver the best service, please ensure you have access to a stable and high quality internet connection when you deliver the online lessons.
-
Teachers can access the eClass library for online materials we have prepared for all the courses.
-
After the lesson, teachers will give students feedback/notes through the system. Students can also give the teachers feedback and a rating.
Payment & fees:
-
Teachers DO NOT have to pay any registration fees or membership costs.
-
Students will pay the company for the lessons through the online payment gateway, by cash or via bank transfer.
-
A lesson will be automatically marked as 'Completed’ 48 hours after the lesson end time unless the student reports an issue with the lesson. We will pay the teachers the lesson price minus commission (18%) for ‘Completed’ lessons. The payment will be arranged in cash or via bank transfer on the 8th of each month for the lessons taught in the previous month.
-
Each student account has a free 30-minute trial lesson. Trial lessons are unpaid.
-
Teachers may terminate their service by writing an email to us and we will still pay for the taught hours on the pay date. We reserve the right to terminate the service and cancel teachers' accounts in the event we believe that the teacher causes any damage to our business (including profit, reputation or goodwill). In this case, teachers will forfeit the outstanding balance. Terminated teachers’ profiles will be removed from the website.
1. CREATE AN ACCOUNT
Step 1: Click the Become a Teacher button on the homepage.

Step 2: Fill in the required information in the registration form. Then please click the Submit button to register.
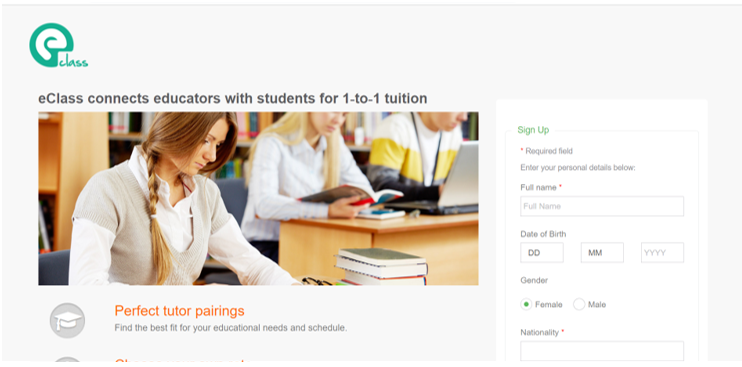
Step 3: After submitting the form successfully, you will receive an email from eClass to verify your account. Click on the verification link in the email to complete your registration. If you cannot find the email in your Inbox, please check your Spam/Junk mailbox.
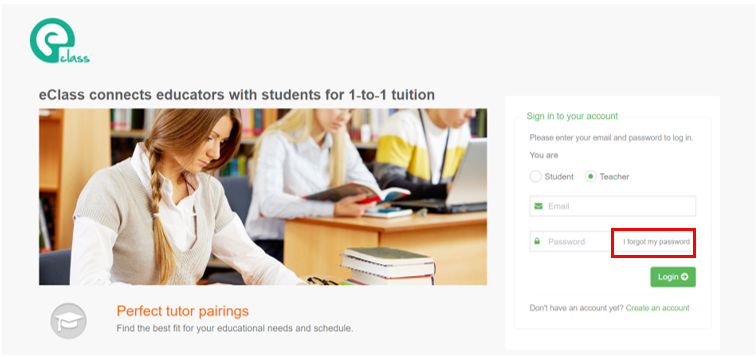
2. LOG IN / LOG OUT / FORGOT PASSWORD
2.1 Log in
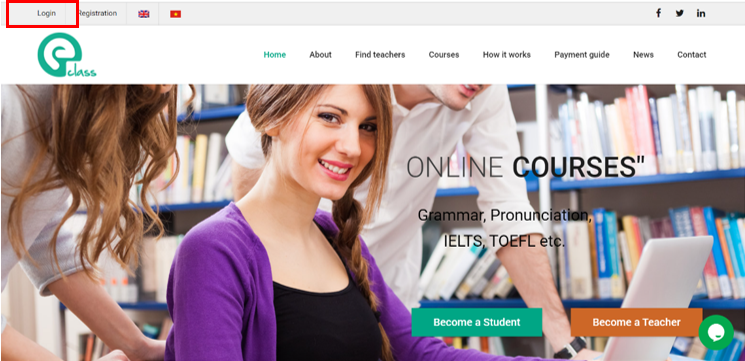
Step 1:Click Login in the top left corner of the homepage.
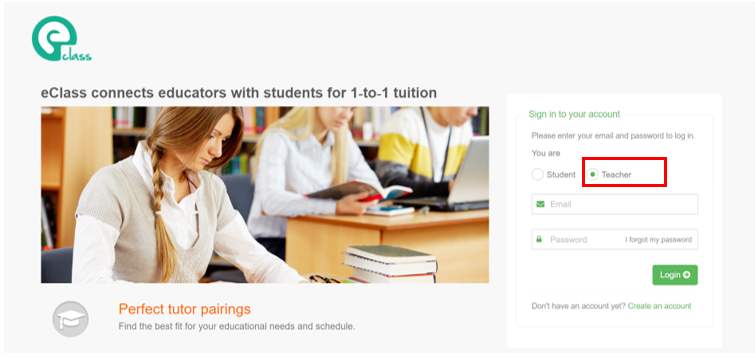
Step 2: In the form, select Teacher. Then fill in your email and password, and click the Login button.
2.2 Log out
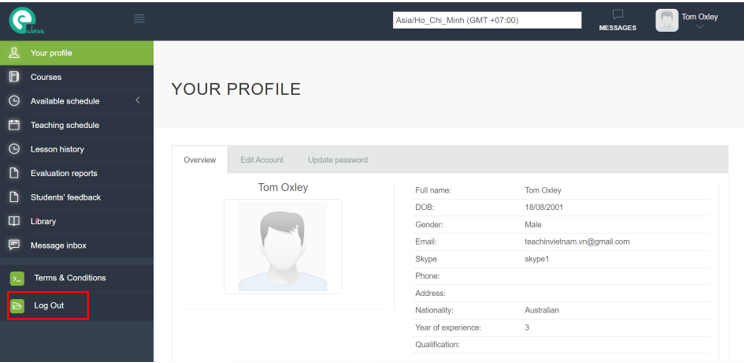
To log out, click Log Out in the left menu.
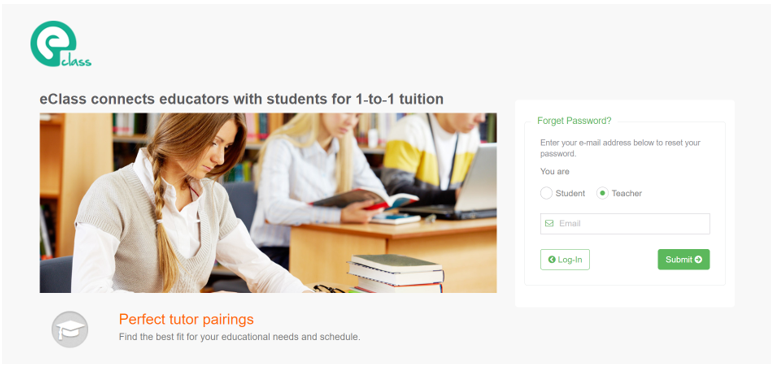
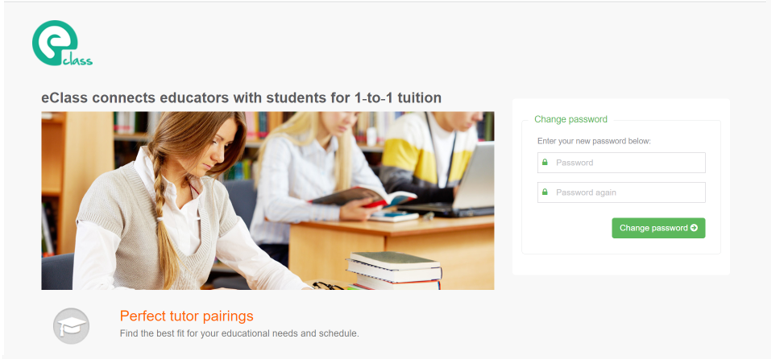
2.3 Forgot password
Step 1: Click I forgot my password in the login form.
Step 2: Select Teacher and enter your email address. Then click the Submit button.
Step 3: You will receive an email from eClass with a link to reset your password. After clicking the link, please enter your new password in the form and click the Change password button.
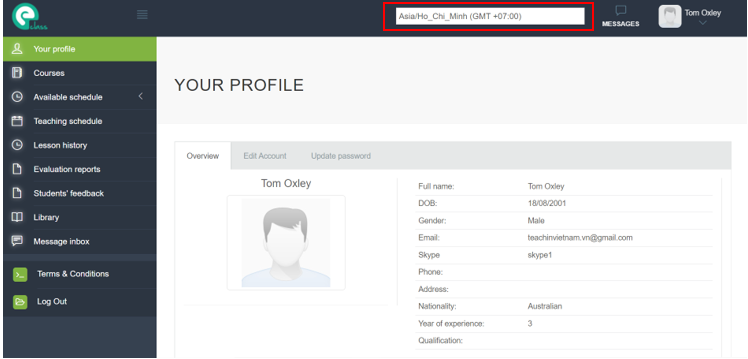
3. UPDATE TEACHER PROFILE
3.1 Update profile
Step 1: Select Your profile from the menu on the left. Then select the Edit account tab.
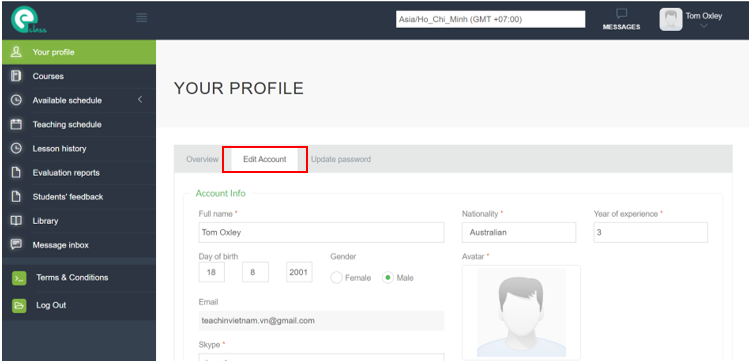
Step 2: Fill in the information you need to update. You can edit everything except Email. Please note:
Avatar field: You need to provide a nice personal photo, maximum size 1MB (png, jpg, jpeg, gif image files are allowed).
Years of experience field: Enter the number of years of experience in teaching.
Qualification field: Your qualifications and work experience.
Introduction field: Introduction to students (maximum 100 words).
Introduction video field: Provide a link to an introductory YouTube video (up to 5 minutes long) for students to watch when searching for a teacher.
The contact information you provide on this page, including Email, Phone and Address, will not be publicly displayed.
After filling in the information, please click Update. The system will display a notice that your profile will be reviewed by the admin before being published on the website. Please click OK to confirm the update. We will review these changes within 48 hours.
3.2 Change password
Step 1: Select Your profile from the menu on the left. Then select the Update password tab.

Step 2: Enter your new password and click the Update button.
3.3 Change time zone
You can update the time zone by selecting the time zone in the list at the top of the page. The time on the website will be displayed in this time zone.
4. UPDATE COURSES
Step 1: Select Courses from the menu on the left.
Step 2: Click the Publish this course button below the course you want to offer. Then click OK to confirm.
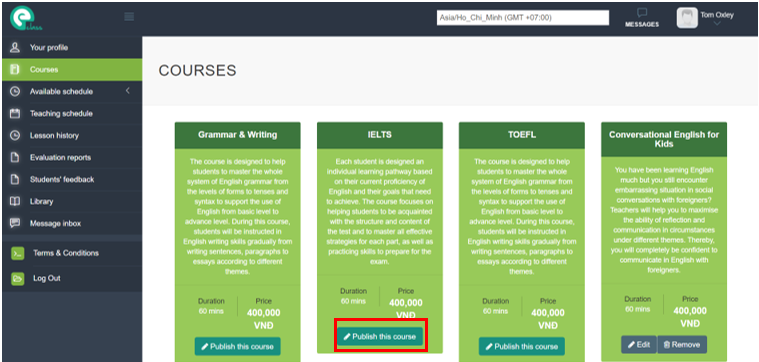
Step 3: You can adjust the hourly rate for the course by entering the new price in the Price field and then clicking the Save button.
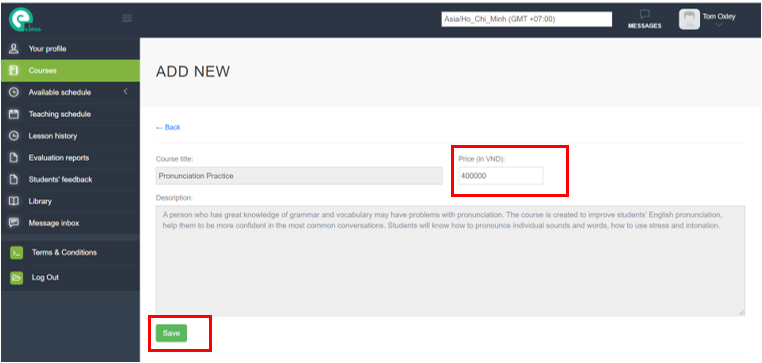
In addition, on the Courses page, you can adjust the price of a previously published course by clicking the Edit button. You can also stop offering a course by clicking the Remove button.
5. UPDATE AVAILABLE SCHEDULE
5.1 Update your availability
Step 1: Select Available schedule -> Update your availability from the left menu.
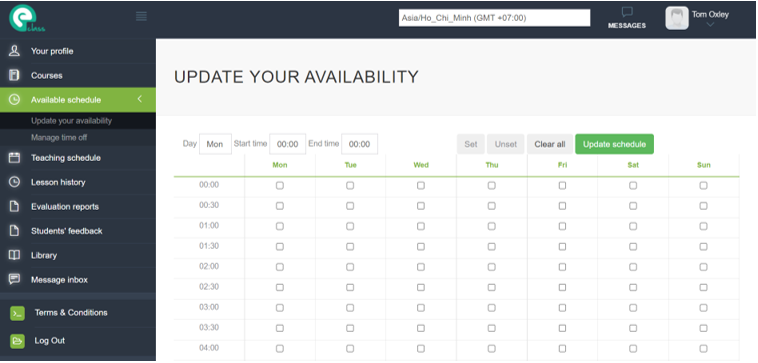
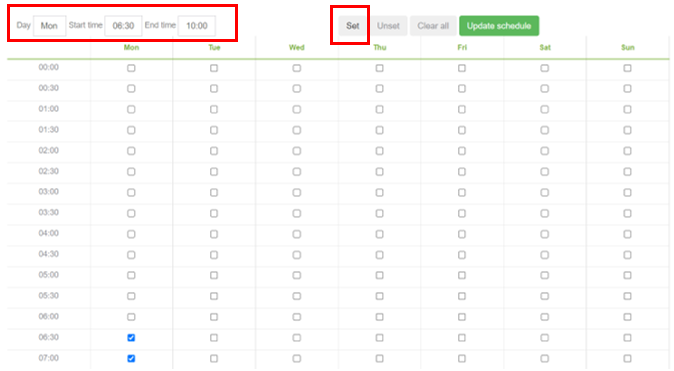
Step 2: Tick the boxes corresponding to the time slots when students can book lessons. Each time slot corresponds to 30 minutes. For example, if you tick the box 08:00 on Tuesday, your students can book a lesson from 08:00 to 08:30 on Tuesday. To quickly select multiple time slots, choose the day of the week (Day), the Start time and the End time. Then click the Set button to select all the time slots during this time. You can also click the Unset button to deselect all the time slots during this time. To deselect all you can click the Clear all button.
Step 3: After selecting the time slots when you can offer classes, click the Update schedule button to save the schedule. This available schedule will then be applied immediately to future bookings.
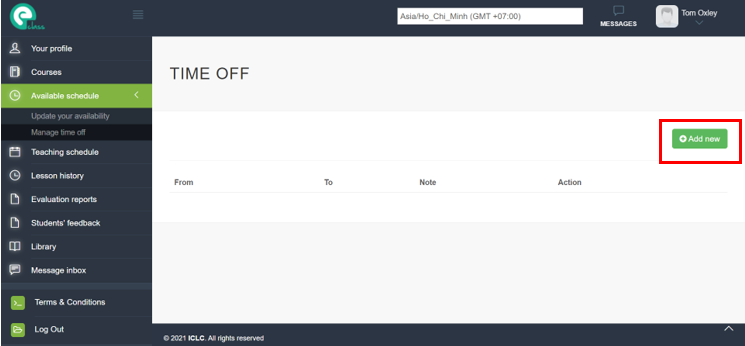
5.2 Manage time off
Step 1: Select Available schedule -> Manage time off from the menu on the left.
Step 2: Click the Add new button to schedule time off.
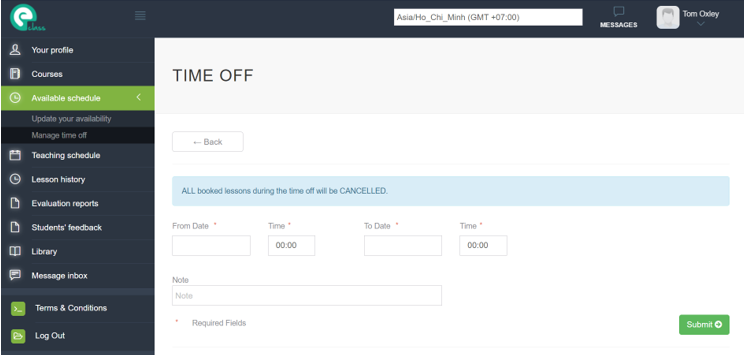
Step 3: Fill in the time off information. You can note the reason for your time off in the Note field. Then click Submit. When you update your leave time, all scheduled classes during this period (if any) will be cancelled, including confirmed classes. Once you do this, this action cannot be undone. Click OK in the dialog box to confirm the update.
6. VIEW TEACHING SCHEDULE
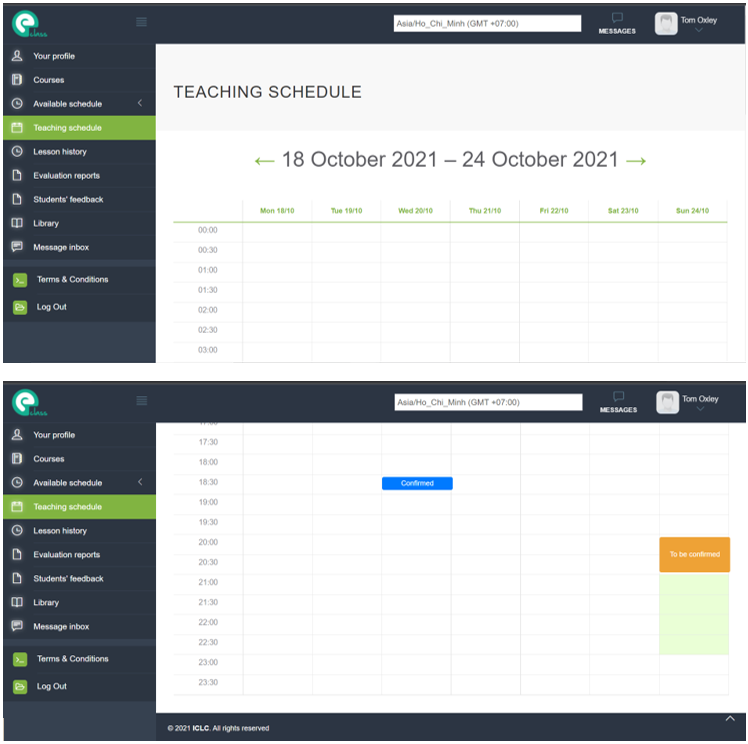
To view your teaching schedule, please select Teaching schedule from the menu on the left. All unconfirmed, confirmed and completed lessons will be shown on the teaching schedule. The green time slots are the time slots available for students to book.
7. CONFIRM / CANCEL A LESSON
7.1 Confirm a lesson
When students book a lesson, you will receive an email notification. At that time, please log in to eClass to confirm the lesson.
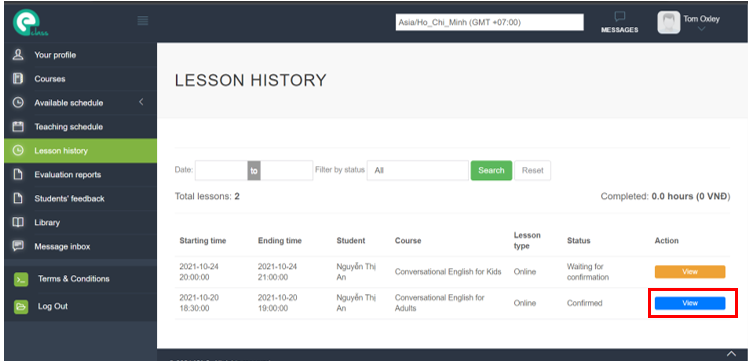
Step 1: Select Lesson history from the menu on the left.
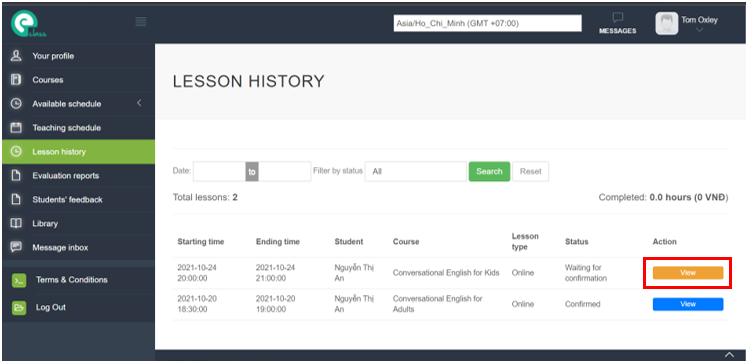
Step 2: Click the View button to the right of the lesson you wish to confirm and a dialog box will appear.
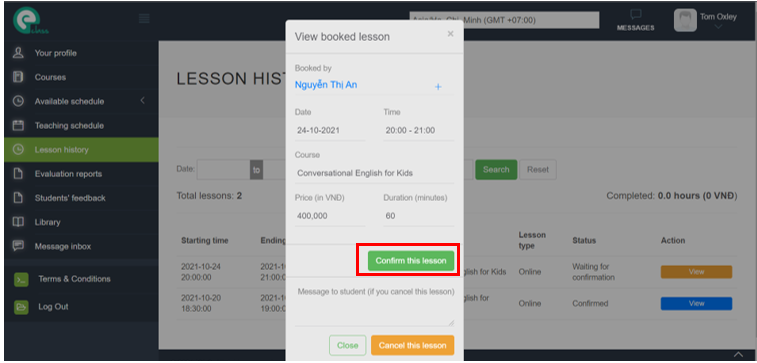
Step 3: Click the Confirm this lesson button to confirm the lesson.
7.2 Cancel a lesson
This procedure is similar to what you do when confirming the lesson, but in Step 3 you can leave a message to the student about the reason for cancelling in the Message field. Then click the Cancel this lesson button to cancel the lesson.
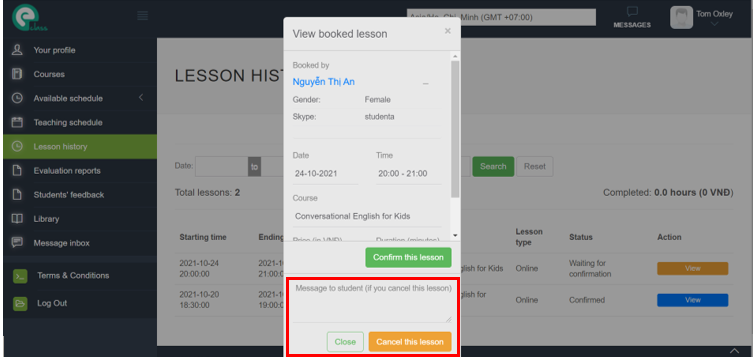
Please note: The cancellation of confirmed lessons must be done at least 08 hours in advance. If the teacher/tutor refuses to teach the student without a valid reason or forgets the schedule and does not attend the lesson, the teacher/tutor will be penalized with a temporary account suspension for 02 weeks. During this period, the teacher/tutor will not be allowed to register for future classes. If the teacher/tutor violates this rule more than 3 times per year, the seller's account will be permanently suspended.
8. VIEW TEACHING HOURS AND FEES
Step 1: Select Lesson history from the menu on the left.
Step 2: Select the time period (in the Date field) you want to see the number of teaching hours and tuition fees for. Click the Search button.
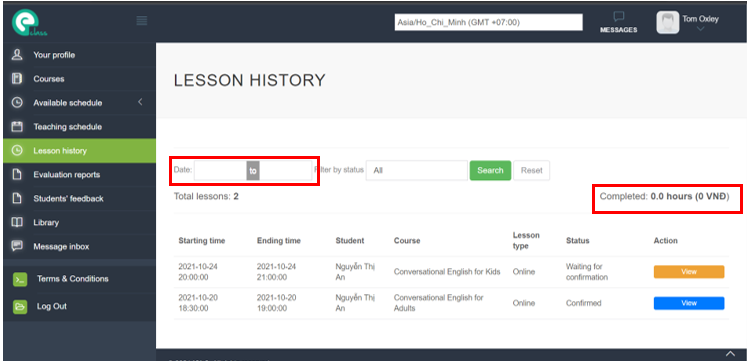
Step 3: The number of completed teaching hours and tuition fees will be displayed on the right above the table. The amount shown here is the amount you will receive (with the commission fee already deducted).
Please note: A lesson will be automatically marked as ‘Completed’ 48 hours after the lesson end time unless the student reports an issue with the lesson.
9. EVALUATE STUDENT PROGRESS
9.1 Add an evaluation
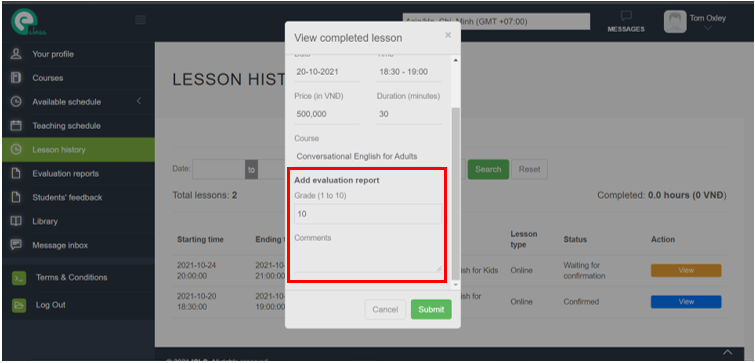
Step 1: Select Lesson history from the menu on the left.
Step 2: Click the View button to the right of the lesson to be assessed and a dialog box will appear.
Step 3: Fill in the evaluation information including Grade and Comments in the dialog box, then click the Submit button.
9.2 View evaluations
To view your completed evaluations, select Evaluation reports from the menu on the left. You can click Details to view the full comment.

10. VIEW STUDENT FEEDBACK
Step 1: Select Students' feedback from the menu on the left.
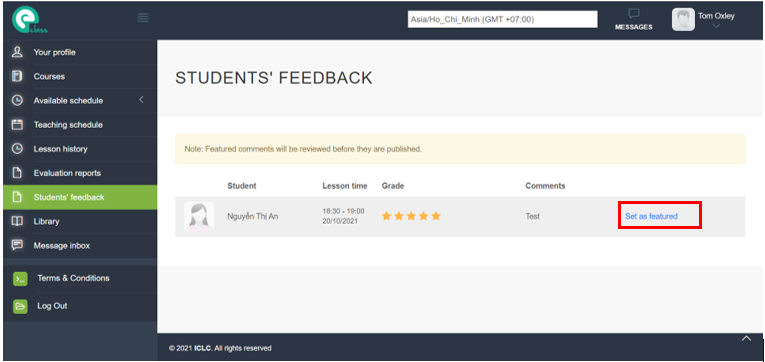
Step 2: All student comments will be displayed on this page. By default, all comments are not visible to the public. You can set which comments you want to be visible to the public by clicking Set as featured. All students will then be able to see these comments in the Featured comments tab in your profile.
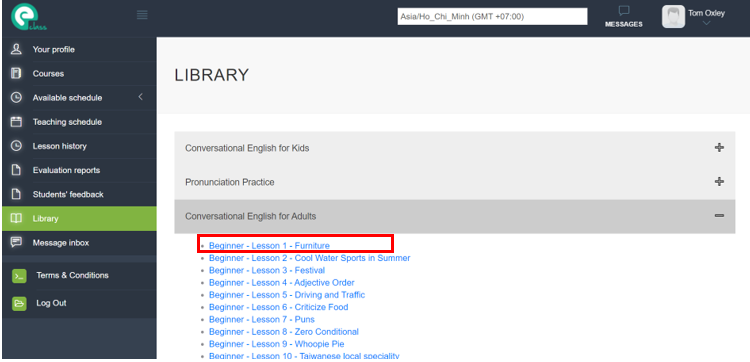
11. VIEW LESSON MATERIALS
Step 1: Select Library from the menu on the left.
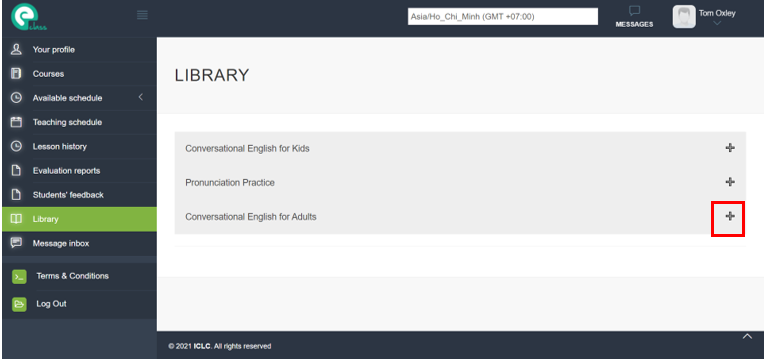
Step 2: Select the course you want to view the materials for. The available lesson materials will then be shown. Click on the lesson you want to view materials for.
Step 3: You will see the document on this page, click the arrows to switch slides. To return to the library click the Back to Library link. During your class, you can share the screen with students via Google meet for students to follow the lesson.
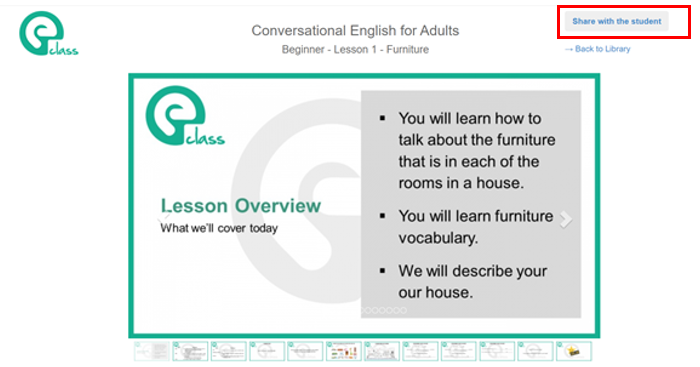
Step 4: During your class, you can also share this document with your students for them to review later by clicking the Share with student button. The document will then be available in the student’s library section for 2 weeks.
You can share up to 2 documents for a 30-minute lesson and 4 documents for a 60-minute lesson. Files cannot be shared during trial lessons.
12. SEND MESSAGES
You can only message students who have booked classes with you.
Step 1: Select Message Inbox from the menu on the left.
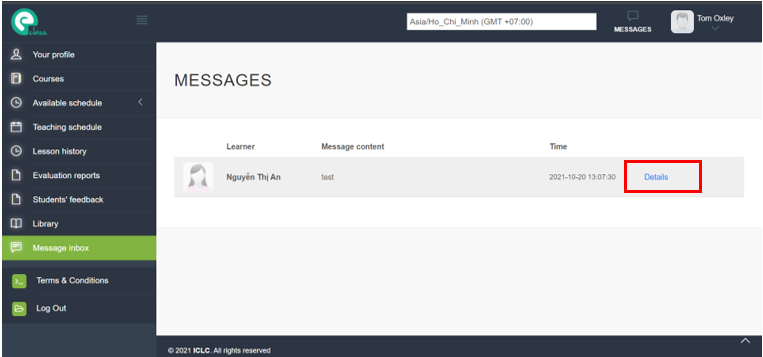
When there is a new message, you will see the message icon in the right corner with a red dot like this . You will also receive an email from the system notifying you of a new message.
Step 2: Click Details to view the messages between you and the student.
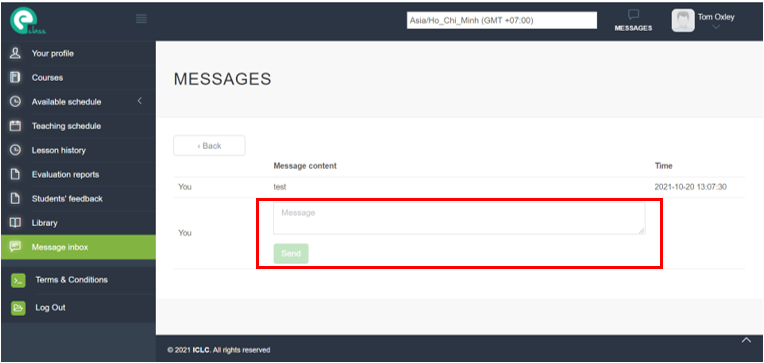
Step 3: On this page you can send a message to the student by filling in the message and clicking the Send button.
 If you need support, please contact us.
Search for teachers
I enjoy learning English with native speakers, but I have been living so far away from Ho Chi Minh city. My hometown is in Can Tho province. But through eClass, I can learn this language with foreign teachers as it is fun to skype with them. English is the subject that I study the best comparing to others at school.
I enjoyed studying a foreign language before but I thought that I am not young anymore and I would rarely communicate with foreigners. Therefore, I was hesitant to participate in any English courses. But suddenly when I was taking a business trip abroad, I found it compulsory to spend an hour per day to study with eClass. Its effect made me feel worthy for what I spent and it brought me the respect from my colleagues, a good evaluation of superiors and even the pride from my children that made me extremely happy.
While my friends at the same age who are very good at English and they are able to keep up with studying to achieve international corporations to apply jobs in national corporations with high salary. Because of the limit of English, I earn less than them. To seek for a better job, I determined to join in an English class and after an 8 month course, my English is consolidated and now I am setting a new goal that is to find out a teacher to teach me about technical English.